MySQL User Management Mastery: A Step-by-Step Guide
Hello Amazing Readers!
Welcome to our MySQL user management blog, where we’ll guide you through the essential steps of creating users, changing host options, and managing permissions. Before we dive in, it’s crucial to note that you’ll need root privileges or a user with sufficient access like CREATE USER and GRANT to carry out these operations.
Let’s get started on this MySQL journey!
Create User
Let’s commence with the fundamental step of creating users in MySQL, unveiling different host options for each.
Syntax:CREATE USER 'username'@'hostname' IDENTIFIED BY 'password';
- Option 1: Create a new MySQL user with localhost:-
CREATE USER ‘demo1’@’localhost’ IDENTIFIED BY ‘Demo1@123’;

Note: This creates a new user, ‘demo1,’ restricted to connecting only from the machine where the MySQL server resides (localhost).
- Option 2: Create a new MySQL user with IP Address:-
CREATE USER ‘demo2’@’192.168.100.22’ IDENTIFIED BY ‘Demo2@123’;

Note: This user, ‘demo2,’ is permitted to connect and perform actions solely from the device with the IP address “192.168.1.100.22”
- Option 3: Create a new MySQL user with ‘%’ (Global host):-
CREATE USER ‘demo3’@’%’ IDENTIFIED BY ‘Demo3@123’;

Note: Using ‘%’ as the host allows access from any IP address.
- Option 4: Rename user and change host:-
Syntax: RENAME USER 'old_user'@'localhost' TO 'new_user'@'localhost';
RENAME USER ‘demo2’@’192.168.100.22’ TO ‘demo1’@’192.168.100.11’;

Note: This command facilitates user and hostname renaming.
- Option 5: Reset MySQL user Password:-
Syntax: ALTER USER ‘username’@’hostname’ IDENTIFIED BY ‘new_password’;
ALTER USER ‘suyog’@’%’ IDENTIFIED BY ‘Suyog@123’;

- Option 6: Drop MySQL user :-
Syntax: DROP USER ‘user_name’@’host’;
DROP USER ‘aswal’@’%’;

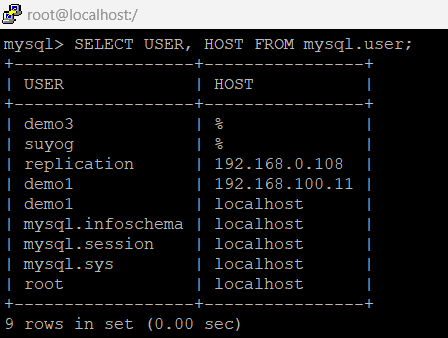
- Option 7: Display all user and it’s hostname :-
SELECT USER, HOST FROM mysql.user;

Grant Permissions in MySQL
Granting permissions is a pivotal aspect of MySQL user management, offering a range of privileges to users.
- All Privileges: Full access to the database
- Insert, Delete, Create, Drop, Select, Update: Specific actions on tables
- Grant Option: Ability to modify other user account privileges
Remember to execute FLUSH PRIVILEGES; after every grant and revoke to reload privileges.
Syntax: GRANT permission_type ON database.table TO 'username'@'localhost';
Option 1: Grant All Privileges on a Database:-
GRANT ALL PRIVILEGES ON *.* TO ‘suyog’@’%’;

Note:- *.* denotes granting privileges for all databases.
Option 2: Grant All Privileges on a Database’s all table:-
GRANT ALL PRIVILEGES ON classicmodels.* TO ‘demo1’@’localhost’;

Note: Granting privileges to all tables in ‘demo1’ Database
Option 3: Grant All Privileges over a specific table from a database
GRANT ALL PRIVILEGES ON classicmodels.employees TO ‘demo3’@’%’;

Note: Granting privileges exclusively on ’employees’ in ‘classicmodels.’
Option 4: Select, Update, Delete, Drop, Create, Alter grants on a single table:-
GRANT SELECT, UPDATE, DELETE, DROP, CREATE, ALTER ON classicmodels.offices TO ‘demo1’@’192.168.100.11’;

Option 5: Give grant option to user:-
GRANT ALL PRIVILEGES ON classicmodels.* TO ‘demo4’@’%’ WITH GRANT OPTION;

Note: Granting the ability to provide privileges to other users. on “classicmodels” database.
Option 6: Revoke ALL PRIVILEGES from user:-
Syntax:- REVOKE privilege_type [, privilege_type, …] ON [database.table] FROM ‘user’@’host’;
REVOKE ALL PRIVILEGES ON * .* FROM ‘demo1’@’localhost’;

Note:- Removing ALL PRIVILEGE from all databases
Option 7: Revoke Grants from user:-
REVOKE select, update, delete, drop ON classicmodels.* FROM ‘demo4’@’%’;

Note:- Removing select, update, delete, drop from classicmodels database
Option 8: Display privileges for user
Syntax:- SHOW GRANTS FOR [‘user’@’host’];
SHOW GRANTS FOR ‘demo3’@’%’;

This concludes our journey through MySQL user management, from user creation to granting and revoking permissions. Stay tuned for our next blog, where we’ll unravel the secrets of resetting user passwords and implementing robust password policies for enhanced security.


Helpful thank you
Very well quoted!!
Very Nice
Awesome job